
Ready to create your perfectly custom board book? Great! With this step-by-step guide, you’ll have a beautiful, completely personalized board book on your doorstep in no time. Read through before you get started or check back on a particular step if you get stuck throughout the process. Each step has an accompanying video to help you find exactly what you need. Let’s get started!
Step 1: Create an Account
Before you begin your project, create an account with a username and password.
Navigate to the blue “Create Now” button and then to “Create an Account” near the top left of the page. Fill in each field with the required name and address information.
Before you get started, it’s important to know that organization is key when putting your board book together. We recommend saving the photos you plan on using in a separate folder on your desktop making them easy to find, access and upload to your template during the design process.
Tip: Be sure to turn off your web browser’s popup blocker. This will avoid any issues with the interface. Learn how to disable your popup blocker if you’re not sure. We also recommend using a strong web browser, such as Google Chrome.
Step 2: Select Your Board Book
Choose which board book you’d like to customize. In the main navigation, check out the Personalized Board Books and Custom Board Books pages, or any of our featured titles. You’ll find a variety of books with ranging levels of customization, page lengths, and sizes.
Custom Designed Board Books give you full control over the book’s design and tell the story of your choosing. There are several levels of customization available from Simple to Advanced to Designer.
Simple board books are built in an easy to use web layout and require fewer photos, allowing more room for text. No additional design skills are required – just upload your photos and text into their designated spots!
Advanced board books are built in a completely customizable web layout, giving you more room for creativity. Once you add your photos and text, you have the ability to customize further by rotating photos, changing colors, font sizes and more.
Lastly, the Designer option allows you to build a completely customized creation offline and upload your finished PDFs to make a truly one of a kind creation.
We also offer Blank Board Books that are awesome for a first-time author or illustrator.
Step 3: Edit The Title & Book Covers
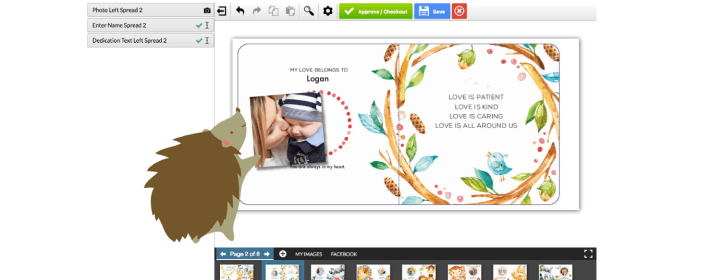
Time to start customizing! Click on each of the grey buttons in the lefthand toolbar to enter in photos and text on the front and back covers and spine of the book.
The dark colored toolbar underneath the book editor is where you will see each page of the book and the place to upload the photos you would like to use. If you want to upload your photos all at once click the “+” button at the top of the toolbar. The “My Images” tab is where these uploaded images will be saved. The “Facebook” tab allows you to directly login to Facebook to retrieve and save photos from an album you have uploaded.
You can also upload your photos by clicking on the placeholder photo provided and hitting the “+ Replace Image” button. This will take you directly to the upload screen and replace the stock photo with your own image.
Tip: After you upload the image, make sure to extend the photo slightly past the line borders to avoid white space around the image.
Step 4: Edit Interior Book Pages
Remaining on the same screen as you were on to edit the book covers and spine, scroll down to the dark toolbar at the bottom to select each interior page to add photos and text.
Tip: If you have received a “low image quality” warning, don’t panic! As long as the template is allowing you to upload the image, it will print just fine. If the image is too low in quality, it will not upload into the template at all. If we have any issues with images, we will contact you before proceeding to production.
Step 5: Check Out
When you’re happy with your creation, click on the green “Finished Editing” button. A pop-up will prompt you to review all pages in your book to make sure everything appears how you would like it to.
Accept the conditions and click Continue to proceed to the shopping cart. Here, you will make sure your shipping information is correct or enter it in if it’s not saved.
Click “Proceed To Check Out” to complete your order!
If you need to tweak something in your book but are already in the cart, don’t worry. Next to the book thumbnail you’ll see a pencil button; click that and it will take you back to the board book template page you selected. From there you can click “customize order” to go back to the editing interface. Once you have made your edits, repeat the previous steps.
You can also edit the address that is associated with your account. Click the arrow next to the address currently listed, then click “new address” and it will allow you to add the new information.
Tip: Any design that you create will stay in your account for 60 days before it’s deleted. So, if you need to go back to order another copy later, you have 60 days to do so.